How to Do Concrete
Calculating – Specifying – Ordering – Pumping – Prior Pour Check List
(Part 3 of 4)
Now that your planning is complete and your forms are in place, we suggest you review the type and amount of concrete you will need.

Calculating the Amount of Concrete
This DIY Concrete Guide will show you how to order concrete and calculate your concrete order. The simple way is to call Carroll’s Building Materials and give us your measurements Length, (Width and desired Depth of the Slab). Another way to calculate the amount is to multiply the length of the slab by the Width of the slab then divide by the appropriate number correlating the depth from the chart below then round up to the next quarter yard. Remember we only charge for what you use rounded up to the next ¼ yard which is the industry standard. So if you are not sure and you want to order a couple more yards that’s ok. However, please don’t over order and specify 10 yards for a 2 yard pour because of the scheduling issues this creates.

Specifying Mix Design
Specifying the correct mix for your job is very important. Concrete specifications consist of Strength (PSI), Slump (basically the thickness), Fiber Mesh, Chemical Additives and whether you require a Concrete Pump. 80% of all concrete poured in Florida is 3000 Psi slab mix or 3000 psi pump mix. Other mixes are also available i.e. 3000 Psi – 5000 Psi mixes, Fine Grout, C-476 Cell and Flowable Fill. All mixes are also available using White Portland, please specify when you order. Below we will cover these specifications:
Specifications
Compressive Strength
Compressive strength must be specified at the time of ordering. (ie. 3000 psi, 3500 psi, 4000 psi, 4500 psi and 5000 psi). More psi = more strength and durability. (Also Note: the higher the PSI the shorter the set time will be.) Typically 80% of the slabs in Florida will be 3000 psi.
Slump
For our tropical environment we recommend a slump of 5-6 inches (+/- 1″). Note: a slump greater than 6″ may prolong the time you have to wait before finishing, particularly in cool weather. It will also increase the tendency for shrinkage cracking. Unless specified all mixes will be delivered at a 5” slump, unless it is going to be pumped in that case we recommend a 5” – 6” slump.

Reinforcing Wire Mesh & Fiber Mesh
When concrete cures the water in the concrete will begin to bleed off as it does the slab will start to shrink just slightly, as it shrinks cracks can form as the slab moves across the base material. These cracks are called shrinkage crack. Using reinforcement such as wire mesh, rebar, or fibers will not prevent cracks. It will, however, hold the concrete together when it does crack and prevent separation or vertical displacement.
While not always required in all counties for sidewalks and driveways, placing wire or fiber mesh in the slab it is highly recommended.

Fiber mesh
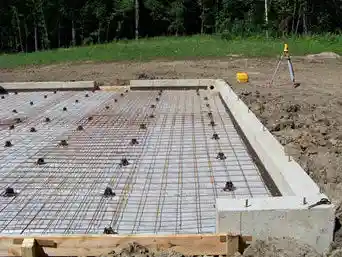
Fiber mesh can be used to replace wire mesh in most instances, except the first 15’ apron of a driveway. (Check your local codes) Reinforcing wire mesh is placed in the slab area prior to the pour the wire mesh is placed on mesh-ups which are 2” plastic chairs designed for wire mesh. (Shown Above Left) Wire that sits on the ground and is not kept in the middle of the slab by mesh-ups will do nothing for shrinkage cracks. Fiber mesh is added into the mix at the time of the pour and is much easier to work with. Most contractors only put in one or the other however, it never hurts to use both, and the additional cost is minimal.
Chemical Additives
In addition to air entraining admixtures, chemical additives may be used to accelerate or retard setting, reduce water or plasticize the concrete. Concrete Exposed to freezing and thawing temperatures should have a minimum compressive strength of 3000 psi and have at least 5% entrained air (+/- 1.5%). Air entrainment allows for the expanded water when frozen to travel into the air voids created by the air additive. Without the air, concrete is at risk for cracking. In Tampa Bay, freeze and thaw cycles are not normally a problem; however, we do include Air Entrainment in all mixes as a finishing and pumping aid.
To Pump or Not to Pumping Concrete
Another thing to consider when learning how to order concrete is to decide whether or not you need a concrete pump. Our Concrete Line Pumps are used when the job is in a hard to reach area that a concrete truck cannot reach with a chute, such as going around a home, buildings, through a building, over tall walls, pouring lintels, etc. We carry 200′ feet of hose (unless specified) and there is a $1.00/ft charge for any length over 200 feet. Some smaller jobs can be wheelbarrowed to save money on the pump, but keep in mind that it is extremely strenuous to try to wheelbarrow and to finish concrete at the same time. We recommend that you have extra help on hand, if you plan on wheelbarrowing a job.
Advantages of Using Concrete Pumps
- Pumped concrete can be placed in areas that are difficult or impossible to reach by other placement methods. Our pipelines can corner sharply, pass through narrow spaces, travel over or under walls, through doorways etc.
- Pumping often results in a savings in manpower and equipment cost and cycle time.
- Pumping is not limited by weather conditions, (snow, rain, heat) as the concrete is protected during transport to the placement area.
- Pumping can be used when the space available for construction equipment is limited.
- Pumping concrete frees cranes and hoists for other construction operations, such as delivering materials.
- Pumped concrete can be easier to handle because the flow of concrete is directed to the exact spot of placement. (where as cranes and conveyors deposit large piles of concrete that must be moved manually).
- A continuous supply of pumped concrete remains steady and controlled, helping set a steady work pace for the placement crew.
- Pumping concrete allows a contractor to place floor slabs on upper floors before completing the concrete work on lower floors. This provides protection from weather when working on lower floors.
- For large pours, multiple pumps can be set up, allowing several trucks to discharge at the same time.
Ordering Concrete
This is the best part. Call Carroll’s Building Materials, then ask for concrete dispatch. You will need the following information:
- Location of the Pour(s) – Because we mix on-site we can pour multiple locations and different mix designs if required.
- Type of pour (i.e Driveway, Sidewalk, Lintel etc.)
- Contact person, Contact cell number
- Required Compressive Strength
- Should we include Concrete Fiber in the mix
- Can we back up to the pour, or do you need a Concrete Pump – Will wheelbarrows be used?
- Is there a washout area?
Note: Concrete Dispatch will call the night before the pour to confirm your delivery, and make sure you are ready to go.
Do It Yourself check List Prior to Pour
- Sub grade must be compacted and moist but, free of standing water
- Forms must be secure and capable of withstanding load pressure of fresh concrete
- Arrange enough help to place and finish concrete. Start with a minimum of two (2) people for a 2 cubic yard pour. Add one (1) person for each additional 8 – 9 cubic yards of concrete. If you are using wheelbarrows to move the concrete from the truck to the forms, add an additional person
- Assign specific responsibilities to helpers before concrete arrives (I.e. who screeds, bull floats, washes tools, etc.)
- Provide acceptable access for delivery: Pathway must be of stable soil able to support up to 80,000 lbs concrete trucks. Pathway must be at least ten (10) feet wide and fourteen (14) feet high Avoid bringing trucks over curbs, sidewalks, or driveways.
- Move any vehicles that may be in the way, or that may get splattered with concrete.
- The discharge chutes can reach approximately twelve (12) feet
- Determine what type of control joints will be used to control cracking; hand tooled or saw cut.
- Concrete used for residential applications should be at least four (4) inches thick
- Placement of control joints should be determined in the planning step
- Control joints should be cut as square as possible.
- The control joint depth should be at least ¼ the thickness of the concrete
- Avoid creating triangles or odd shaped panels when placing control joints Have all tools out and ready to go
- Have water hose ready
- Pick up any debris around the work area that may become a tripping hazard.
- Make sure to have all imbeds ready to go, (i.e. Truss straps if you are pouring a lintel)
- If required have a washout area ready
- Never hurts to have plastic ready in case of bad weather.
- If you are pouring next to something that may get splattered with concrete (ie Sliding glass door), cover it with plastic prior to the pour. One less thing you have to worry about.
- Have drinking water available for your crew
- If curing compounds are to be used have them ready to go
- Have a cell phone on-site so you can keep in touch with our concrete dispatcher
